
As you have seen so far in this book, the combination of ActiveX Controls and VBScript enables you to build Web pages and Web applications that have the look, feel, and functionality of Windows applications. However, one final piece needs to be fitted into the puzzle to make this picture complete: on-screen positioning.
Using HTML, paragraphs, text, graphics, and controls are positioned on-screen basically in the order that the browser finds them within the HTML source code. Recent developments such as tables have improved the situation somewhat, but it is still not possible within HTML to position a control at an exact location on the screen, nor is it possible to position controls independent of other controls.
The HTML Layout Control gives you the ability to position controls on-screen to the nearest pixel. The HTML Layout Control is a true Windows form that is included or embedded into your HTML document as a single ActiveX Control. The Layout Control handles all the individual controls you place within it, and using controls within a Layout affords a wider range of events, properties, and methods, enhancing the functionality of the ActiveX Controls even further.
The HTML Layout Control is another ActiveX Control, with one difference: It contains and handles other ActiveX Controls. You can build a Layout quickly and easily using the drag and drop metaphor. It is a true visual development environment. If you have experience using other visual programming environments such as Visual Basic, Visual C++, or Delphi, you will almost instantly be familiar with the HTML Layout Control.
The definitions and declarations of the ActiveX Controls contained within a particular HTML Layout Control and the associated scripts are all held within one file, which is easily added to the HTML document. Another advantage of the Layout Control is that the object definition in the HTML document doesn't change. Therefore, you can make modifications to your Layout Control without changing the HTML document. Furthermore, the same Layout can be used in multiple documents-for example, as a shared tool bar or menu.
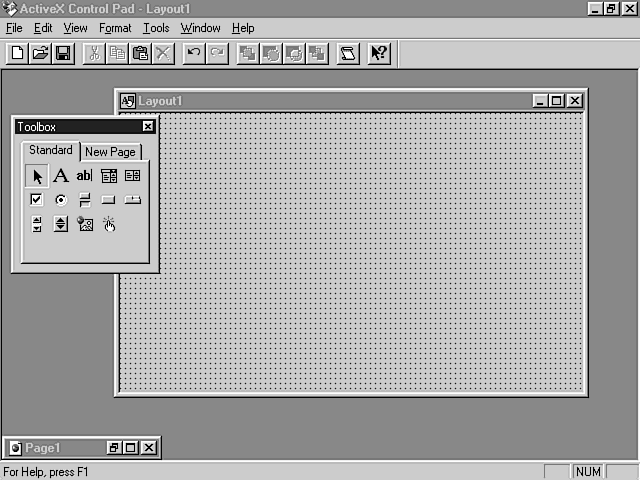
To create a Layout, you use the HTML Layout Control development area, which is accessed via the ActiveX Control Pad. Open the ActiveX Control Pad and select New HTML Layout from the File menu.
A blank Layout and the HTML Layout tool box are then displayed, as shown in Figure 14.1.
Now let's have a look at the features of the Layout development environment and how they work together.
The HTML Layout Control tool box, shown in Figure 14.2, contains the ActiveX Controls that you have available to use in your new Layout.
Figure 14.2 : The HTML Layout Control tool box.
When you first load the Layout Control, the tool box consists of two pages. However, you can add further pages to the tool box as required later.
The first page, named Standard, holds the controls that will always work with MSIE3.0. These are the Microsoft Forms 2.0 controls that you have used so far in the ActiveX Control Pad, plus a couple of MSIE-specific controls-the Image and the Hot Spot Controls.
The standard ActiveX Controls are as follows:
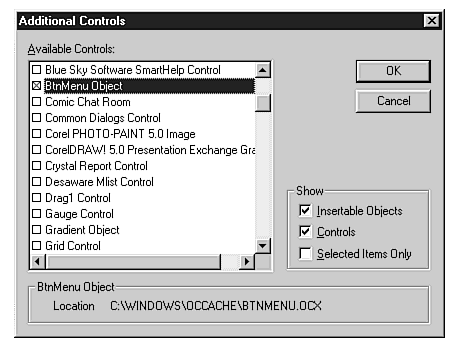
The second page, and any subsequent pages, of the tool box that you create are for you to add further ActiveX Controls. Note that new controls that you download from the Web are not automatically available in the tool box. (See Chapter 13, "Implementing an ActiveX Menu Control.") Let's look at how you add further controls to the tool box.
To add a new control that you have downloaded from the Web, follow these steps:
| Note |
If you run out of room on a tool box page, you can either resize the tool box by dragging the sides and bottom, or you can add more pages. Simply right-click the tab at the top of a page to display the page management pop-up menu. Development teams can also share complete pages of controls using the import and export page facility. |
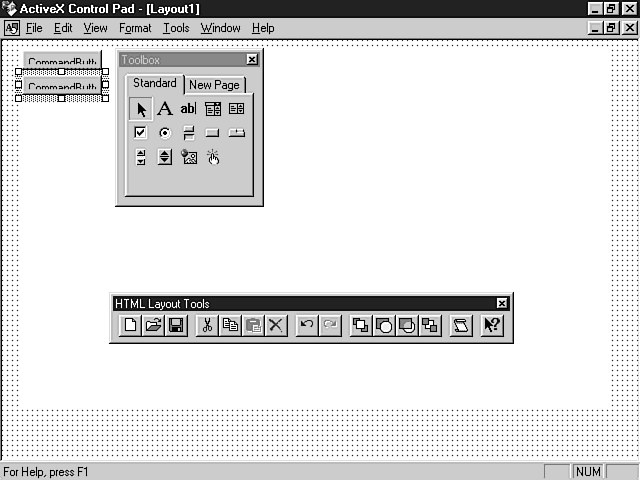
The HTML Layout Control tool bar is the same tool bar you have used in the Control Pad (refer to Figure 14.1). However, when you have more than one control on the layout, the four layering buttons are enabled (see Figure 14.6).
Figure 14.6 : The HTML Layout Control tool bar.
The layering buttons enable you to position overlapping controls in a second dimension-depth. The four buttons allow you to move a control forward, backward, to the front, and to the back. Later in the chapter, you'll see how this works in practice.
The tool bar itself is dockable, which means that it can be dragged from its usual place under the menu and can be free-floating or docked to the left, the right, or even the bottom of the screen.
Before you begin to create a real example, you need to know the following main functions of the HTML Layout Control:
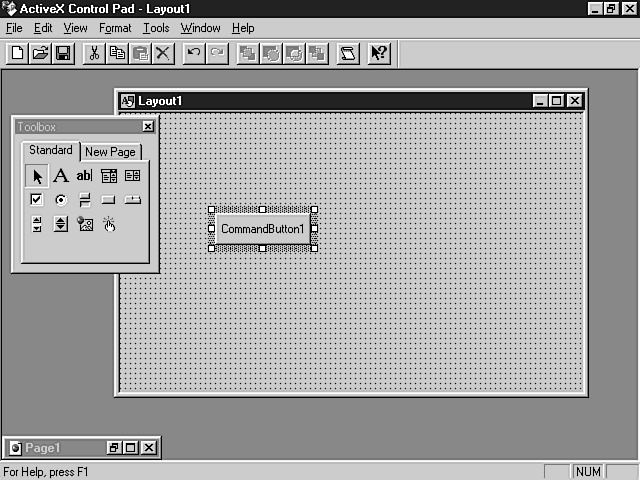
As you pass your mouse pointer over the tool box, the control icons become clickable buttons. Adding a control to the Layout is as simple as clicking the control's icon in the tool box and then clicking on the Layout in the approximate position where you need the control. Follow these steps to add a Command Button to your new Layout:
You can move and resize the button by dragging it using the mouse.
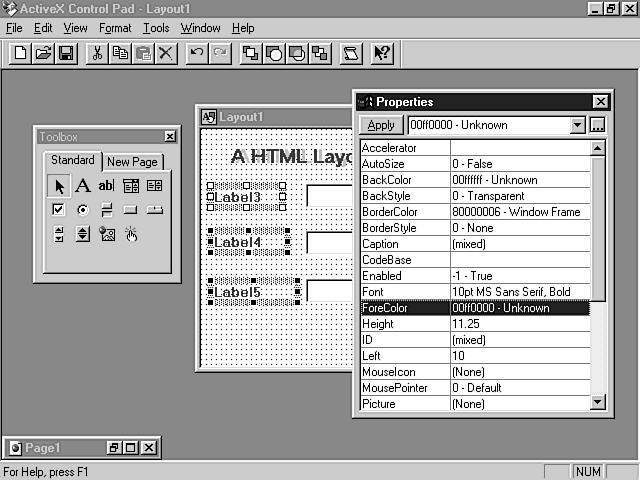
The majority of a control's properties are available and can be amended at design time. To launch the Properties window, either right-click the control and select Properties from the pop-up menu, or select Properties from the View menu.
The Properties window for the Command Button that you just added to the Layout is shown in Figure 14.8.
Figure 14.8 : The Properties window for the Command Button.
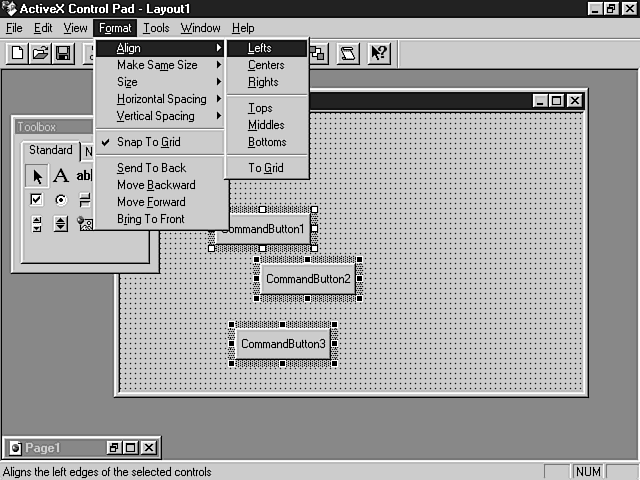
Let's look at how you can very quickly size and align multiple controls on a Layout. For this demonstration, you need to add two more Command Buttons to the Layout.
| Note |
Unlike adding ActiveX controls to an HTML file in the ActiveX Control Pad, when you add new controls of the same type to a Layout, the IDs are automatically numbered sequentially. For example, if you add a series of command buttons, their IDs are numbered CommandButton1, CommandButton2, and so on. |
The Layout Control has a wide variety of menu options for sizing, spacing, and aligning controls, making the job of form building very quick and easy. To align the three buttons, follow these steps:
| Note |
The Layout Control uses the alignment or size properties of one of the controls to align or size the others. This control is called the dominant control, and it is differentiated from the other controls by its white sizing handles. |
One of the unique benefits of the Layout Control is its capability to layer controls (place one control on top of another), which is impossible in standard HTML.
To see how this works, drag the buttons so that CommandButton2 sits on top of CommandButton1 and CommandButton3 sits on top of CommandButton2. Then select CommandButton2, as shown in Figure 14.11.
Figure 14.11: The buttons placed on top of each other.
To change the layer in which CommandButton2 resides, use one of the following methods:
Using any of the preceding methods, you can move the button in these directions: to the front, forward one layer, back one layer, to the back.
Take a moment to play around with the different commands. The button is shown moved to the front layer in Figure 14.12.
Figure 14.12: CommandButton2 brought to the front.
Layering buttons in this way doesn't have many practical uses-at least none that I can think of. But how often would you have liked to overlay one .gif or .jpg image on top of another? Combine this with the fact that you can change a control's position at runtime, and you're into the realm of very easy animation with relatively small graphics files. For an example of this, see Chapter 16, "Real-Life Examples II."
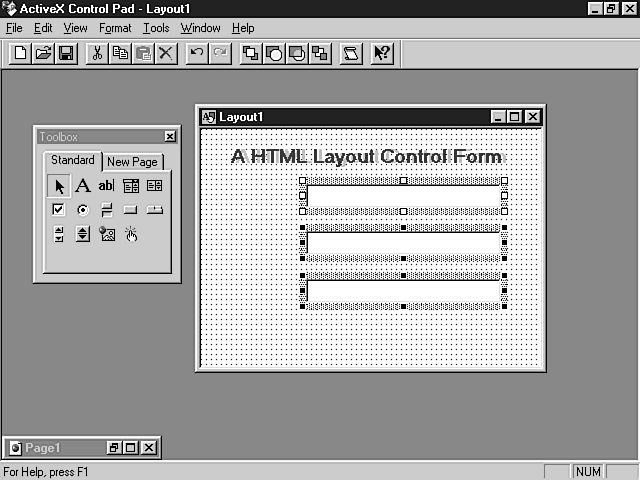
Now that you've experienced the main functionality of the Layout Control, it's time to create a real Layout. You will create a form, which you will then add to an HTML page. Then you add some scripting to the form to do some rudimentary validation.
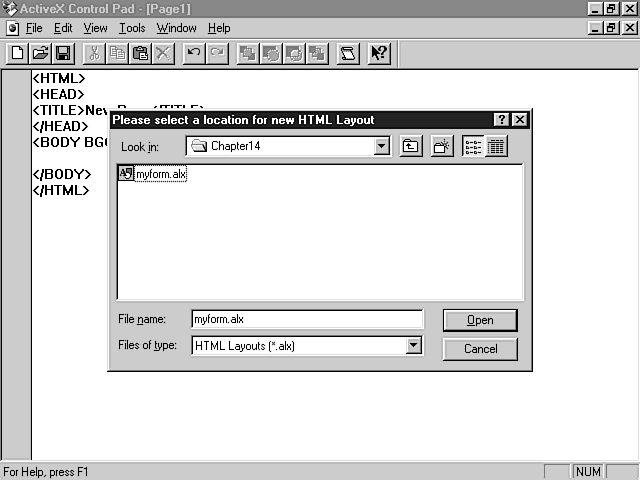
Adding a prebuilt Layout Control to an HTML page is as easy, if not easier, than adding an ActiveX control.
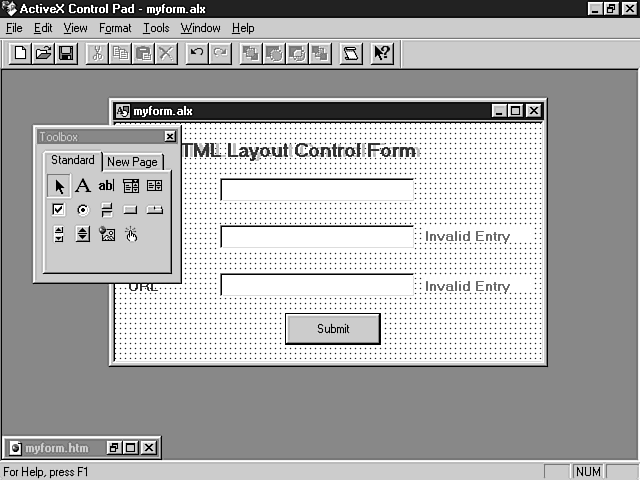
Adding VBScript to an HTML Layout using the Script Wizard is as easy as using the ActiveX Control Pad. In this part of the example, you add two further labels, which will act as a warning to the user that his input is invalid. The labels are only made visible if a conditional test on the input fails.
Your Layout form should now look like the one in Figure 14.22.
Figure 14.22: The form with the warning label added.
With the Layout Control still open, start the Script Wizard.
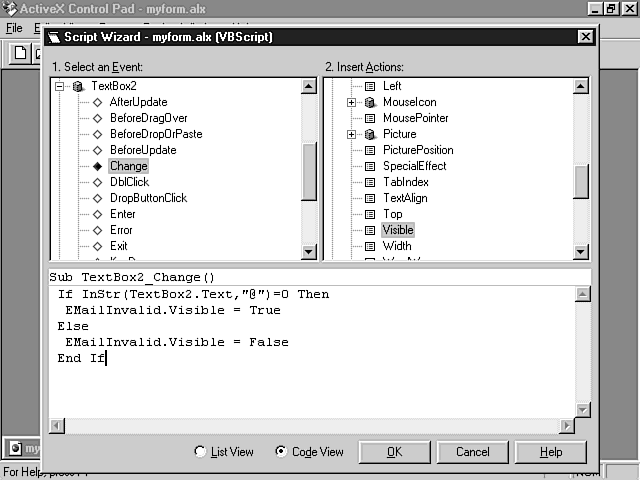
Locate the TextBox2 Control in the left actions pane, and select the control's Change event. Enter the following code in the Change event handler.
If InStr(TextBox2.Text,"@")=0 Then
 EMailInvalid.Visible = True
Else
 EMailInvalid.Visible = False
End If
The code searches for the @ symbol somewhere within the user's entry. If it is found, the entry is considered valid; if it is not found, Instr() returns 0, the entry is considered invalid, and the warning label is shown (visible=True).
The code within the event handler is shown in Figure 14.23.
Figure 14.23: The event handler for the TextBox2_Change event .
Now select the Change event for TextBox3, and enter the following code:
If Left(TextBox3.Text,4) <> "http" Then
 URLInvalid.Visible = True
Else
 URLInvalid.Visible = False
End If
This code simply makes sure that the first four characters are http. The rest of the event handler is similar to the first one. The completed event handler is shown in Figure 14.24.
Figure 14.24: The completed event handler for the TextBox3_Change event.
Click OK and the Script Wizard adds the required code to the Layout Control's source. Save the Layout.
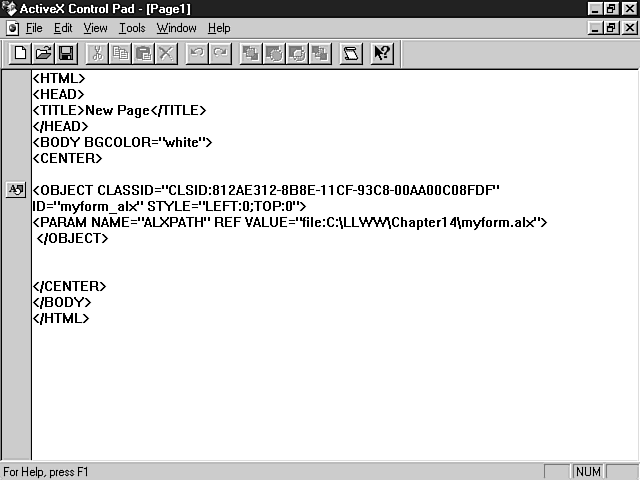
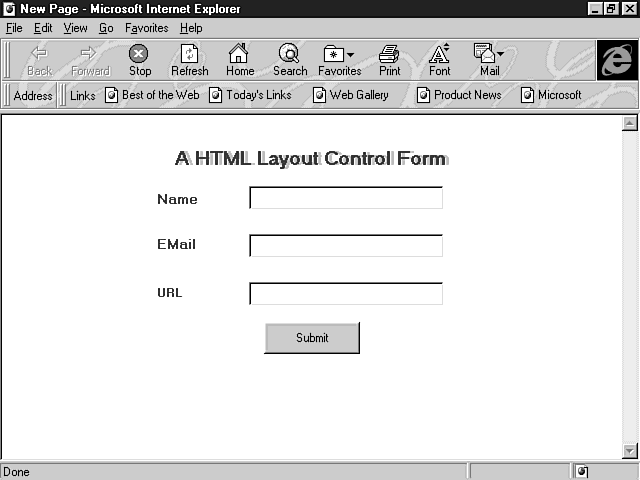
There is no need to make any changes to the HTML page that uses the Layout Control. Run the page though the browser. If you still have the browser open, you can simply click Refresh.
Figure 14.25 shows the page with the scripted Layout Control working.
Figure 14.25: The Web page, complete with scripted Layout form.
| Note |
To run this control and Web page from a Web server, simply change the ALXPATH parameter in the HTML object definition, like this: <PARAM NAME="ALXPATH" REF VALUE="http://www.mydomain.com/subdir/ |
You might wonder where the VBScript code and all the definitions for the Layout Control you just created went. You can open myform.alx in Notepad or a similar text editor; or within the Layout Control, right-click any of the controls on the Layout (or click the Layout itself), and select View Source Code from the pop-up menu. The full source code held within myform.alx looks like this:
<SCRIPT LANGUAGE="VBScript">
<!--
Sub TextBox3_Change()
 If Left(TextBox3.Text,4) <> "http" Then
  URLInvalid.Visible = True
 Else
  URLInvalid.Visible = False
 End If
end sub
-->
</SCRIPT>
<SCRIPT LANGUAGE="VBScript">
<!--
Sub TextBox2_Change()
 If InStr(TextBox2.Text,"@")=0 Then
  EMailInvalid.Visible = True
 Else
  EMailInvalid.Visible = False
 End If
end sub
-->
</SCRIPT>
<DIV BACKGROUND="#ffffff" ID="Layout1" STYLE="LAYOUT:FIXED;
WIDTH:320pt;HEIGHT:178pt;">
    <OBJECT ID="Label1"
     CLASSID="CLSID:978C9E23-D4B0-11CE-Bf2D-00AA003f40D0" STYLE="TOP:11pt;LEFT:26pt;WIDTH:218pt;HEIGHT:19pt;ZINDEX:0;">
        <PARAM NAME="ForeColor" VALUE="12632256">
        <PARAM NAME="BackColor" VALUE="16777215">
        <PARAM NAME="VariousPropertyBits" VALUE="8388627">
        <PARAM NAME="Caption" VALUE="A HTML Layout Control Form">
        <PARAM NAME="Size" VALUE="7673;661">
        <PARAM NAME="FontEffects" VALUE="1073741825">
        <PARAM NAME="FontHeight" VALUE="280">
        <PARAM NAME="FontCharSet" VALUE="0">
        <PARAM NAME="FontPitchAndFamily" VALUE="2">
        <PARAM NAME="FontWeight" VALUE="700">
    </OBJECT>
    <OBJECT ID="Label2"
     CLASSID="CLSID:978C9E23-D4B0-11CE-Bf2D-00AA003f40D0" STYLE="TOP:11pt;LEFT:23pt;WIDTH:218pt;HEIGHT:19pt;ZINDEX:1;">
        <PARAM NAME="ForeColor" VALUE="16711680">
        <PARAM NAME="BackColor" VALUE="16777215">
        <PARAM NAME="VariousPropertyBits" VALUE="8388627">
        <PARAM NAME="Caption" VALUE="A HTML Layout Control Form">
        <PARAM NAME="Size" VALUE="7673;661">
        <PARAM NAME="FontEffects" VALUE="1073741825">
        <PARAM NAME="FontHeight" VALUE="280">
        <PARAM NAME="FontCharSet" VALUE="0">
        <PARAM NAME="FontPitchAndFamily" VALUE="2">
        <PARAM NAME="FontWeight" VALUE="700">
    </OBJECT>
    <OBJECT ID="TextBox1"
     CLASSID="CLSID:8BD21D10-EC42-11CE-9E0D-00AA006002f3" STYLE="TOP:41pt;LEFT:79pt;WIDTH:146pt;HEIGHT:18pt;TABINDEX:2;ZINDEX:2;">
        <PARAM NAME="VariousPropertyBits" VALUE="746604571">
        <PARAM NAME="Size" VALUE="5159;635">
        <PARAM NAME="FontCharSet" VALUE="0">
        <PARAM NAME="FontPitchAndFamily" VALUE="2">
        <PARAM NAME="FontWeight" VALUE="0">
    </OBJECT>
    <OBJECT ID="TextBox2"
     CLASSID="CLSID:8BD21D10-EC42-11CE-9E0D-00AA006002f3" STYLE="TOP:77pt;LEFT:79pt;WIDTH:146pt;HEIGHT:18pt;TABINDEX:3;ZINDEX:3;">
        <PARAM NAME="VariousPropertyBits" VALUE="746604571">
        <PARAM NAME="Size" VALUE="5159;635">
        <PARAM NAME="FontCharSet" VALUE="0">
        <PARAM NAME="FontPitchAndFamily" VALUE="2">
        <PARAM NAME="FontWeight" VALUE="0">
    </OBJECT>
    <OBJECT ID="TextBox3"
     CLASSID="CLSID:8BD21D10-EC42-11CE-9E0D-00AA006002f3" STYLE="TOP:113pt;LEFT:79pt;WIDTH:146pt;HEIGHT:18pt;TABINDEX:4;ZINDEX:4;">
        <PARAM NAME="VariousPropertyBits" VALUE="746604571">
        <PARAM NAME="Size" VALUE="5159;635">
        <PARAM NAME="FontCharSet" VALUE="0">
        <PARAM NAME="FontPitchAndFamily" VALUE="2">
        <PARAM NAME="FontWeight" VALUE="0">
    </OBJECT>
    <OBJECT ID="Label3"
     CLASSID="CLSID:978C9E23-D4B0-11CE-Bf2D-00AA003f40D0" STYLE="TOP:45pt;LEFT:10pt;WIDTH:49pt;HEIGHT:11pt;ZINDEX:5;">
        <PARAM NAME="ForeColor" VALUE="16711680">
        <PARAM NAME="BackColor" VALUE="16777215">
        <PARAM NAME="VariousPropertyBits" VALUE="8388627">
        <PARAM NAME="Caption" VALUE="Name">
        <PARAM NAME="Size" VALUE="1720;397">
        <PARAM NAME="FontEffects" VALUE="1073741825">
        <PARAM NAME="FontHeight" VALUE="200">
        <PARAM NAME="FontCharSet" VALUE="0">
        <PARAM NAME="FontPitchAndFamily" VALUE="2">
        <PARAM NAME="FontWeight" VALUE="700">
    </OBJECT>
    <OBJECT ID="Label4"
     CLASSID="CLSID:978C9E23-D4B0-11CE-Bf2D-00AA003f40D0"
STYLE="TOP:79pt;LEFT:10pt;WIDTH:53pt;HEIGHT:11pt;ZINDEX:6;">
        <PARAM NAME="ForeColor" VALUE="16711680">
        <PARAM NAME="BackColor" VALUE="16777215">
        <PARAM NAME="VariousPropertyBits" VALUE="8388627">
        <PARAM NAME="Caption" VALUE="EMail">
        <PARAM NAME="Size" VALUE="1852;397">
        <PARAM NAME="FontEffects" VALUE="1073741825">
        <PARAM NAME="FontHeight" VALUE="200">
        <PARAM NAME="FontCharSet" VALUE="0">
        <PARAM NAME="FontPitchAndFamily" VALUE="2">
        <PARAM NAME="FontWeight" VALUE="700">
    </OBJECT>
    <OBJECT ID="Label5"
     CLASSID="CLSID:978C9E23-D4B0-11CE-Bf2D-00AA003f40D0" STYLE="TOP:116pt;LEFT:10pt;WIDTH:60pt;HEIGHT:11pt;ZINDEX:7;">
        <PARAM NAME="ForeColor" VALUE="16711680">
        <PARAM NAME="BackColor" VALUE="16777215">
        <PARAM NAME="VariousPropertyBits" VALUE="8388627">
        <PARAM NAME="Caption" VALUE="URL">
        <PARAM NAME="Size" VALUE="2117;397">
        <PARAM NAME="FontEffects" VALUE="1073741825">
        <PARAM NAME="FontHeight" VALUE="200">
        <PARAM NAME="FontCharSet" VALUE="0">
        <PARAM NAME="FontPitchAndFamily" VALUE="2">
        <PARAM NAME="FontWeight" VALUE="700">
    </OBJECT>
    <OBJECT ID="CommandButton1"
     CLASSID="CLSID:D7053240-CE69-11CD-A777-00DD01143C57" STYLE="TOP:143pt;LEFT:128pt;WIDTH:72pt;HEIGHT:24pt;TABINDEX:8;ZINDEX:8;">
        <PARAM NAME="Caption" VALUE="Submit">
        <PARAM NAME="Size" VALUE="2540;846">
        <PARAM NAME="FontCharSet" VALUE="0">
        <PARAM NAME="FontPitchAndFamily" VALUE="2">
        <PARAM NAME="ParagraphAlign" VALUE="3">
        <PARAM NAME="FontWeight" VALUE="0">
    </OBJECT>
    <OBJECT ID="EMailInvalid"
     CLASSID="CLSID:978C9E23-D4B0-11CE-Bf2D-00AA003f40D0" STYLE="TOP:79pt;LEFT:233pt;WIDTH:83pt;HEIGHT:11pt;DISPLAY:NONE;ZINDEX:9;">
        <PARAM NAME="ForeColor" VALUE="255">
        <PARAM NAME="BackColor" VALUE="16777215">
        <PARAM NAME="Caption" VALUE="Invalid Entry">
        <PARAM NAME="Size" VALUE="2911;397">
        <PARAM NAME="FontEffects" VALUE="1073741825">
        <PARAM NAME="FontHeight" VALUE="200">
        <PARAM NAME="FontCharSet" VALUE="0">
        <PARAM NAME="FontPitchAndFamily" VALUE="2">
        <PARAM NAME="FontWeight" VALUE="700">
    </OBJECT>
    <OBJECT ID="URLInvalid"
     CLASSID="CLSID:978C9E23-D4B0-11CE-Bf2D-00AA003f40D0" STYLE="TOP:116pt;LEFT:233pt;WIDTH:83pt;HEIGHT:11pt;DISPLAY:NONE;ZINDEX:10;">
        <PARAM NAME="ForeColor" VALUE="255">
        <PARAM NAME="BackColor" VALUE="16777215">
        <PARAM NAME="Caption" VALUE="Invalid Entry">
        <PARAM NAME="Size" VALUE="2910;397">
        <PARAM NAME="FontEffects" VALUE="1073741825">
        <PARAM NAME="FontHeight" VALUE="200">
        <PARAM NAME="FontCharSet" VALUE="0">
        <PARAM NAME="FontPitchAndFamily" VALUE="2">
        <PARAM NAME="FontWeight" VALUE="700">
    </OBJECT>
</DIV>
In this chapter, you've seen the HTML Layout Control, an excellent way to create reusable forms, menus, and in fact, any sort of ActiveX Web page. It's quick and easy, and above all, it can reduce the maintenance time on the overall Web site. The HTML Layout Control is a truly visual development environment for your Web pages, giving results that rival or exceed those produced using professional Windows development tools.
See the following chapters for more information and examples of using the HTML Layout Control:
| What if I use nonstandard controls in my HTML Layout? | |
| Using nonstandard controls in an HTML Layout is the same as using them directly on a Web page. You need to put a copy of a control on your server, and then set the CodeBase property of the control to point to your server. |


